
EL式(Expression Language)徹底解説 – JSP開発の新たな表現力
EL式とは何か Expression Language(EL式)は、JSPページ内でデータにアクセスし操作するための簡潔な言語です。JSP 2.0から標準導入さ […]
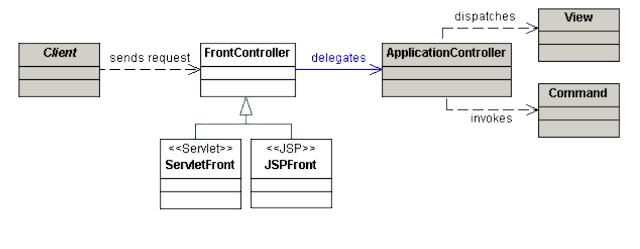
モデル2(MVC)アーキテクチャを学んだ皆さんは、次に「フロントコントローラーパターン」という重要な設計パターンを理解する必要があります。この記事では、フロントコントローラーの基本概念から実装方法、そして既存のMVCアプリケーションをどのように発展させるかまでを詳細に解説します。
フロントコントローラーパターンは、すべてのリクエストを単一のコントローラーで受信し、適切なハンドラーに振り分ける設計パターンです。基本的なMVCモデルをさらに発展させたもので、大規模アプリケーション開発において以下のメリットを提供します。
| 特徴 | 従来のモデル2 | フロントコントローラー |
|---|---|---|
| コントローラー数 | 複数(機能ごと) | 1つ(中央集権型) |
| 共通処理 | 各コントローラーで重複 | 一箇所で集中管理 |
| リクエストルーティング | URLごとに設定 | 内部で動的に決定 |
| 拡張性 | やや制限あり | 高い |
| 設定の一元化 | 分散 | 集中管理 |
@WebServlet("/*")
public class FrontControllerServlet extends HttpServlet {
    private Map commands;

    @Override
    public void init() {
        commands = new HashMap<>();
        // コマンドの登録
        commands.put("/user/list", new ListUsersCommand());
        commands.put("/user/add", new AddUserCommand());
        commands.put("/product/list", new ListProductsCommand());
        // 他のコマンド...
    }

    protected void service(HttpServletRequest request, HttpServletResponse response)
            throws ServletException, IOException {

        String path = request.getPathInfo();
        Command command = commands.get(path);

        if (command == null) {
            response.sendError(HttpServletResponse.SC_NOT_FOUND);
            return;
        }

        String viewPath = command.execute(request, response);
        RequestDispatcher dispatcher = request.getRequestDispatcher(viewPath);
        dispatcher.forward(request, response);
    }
} public interface Command {
String execute(HttpServletRequest request, HttpServletResponse response)
throws ServletException, IOException;
}public class ListUsersCommand implements Command {
private UserService userService = new UserService();
public String execute(HttpServletRequest request, HttpServletResponse response) {
List users = userService.getAllUsers();
request.setAttribute("users", users);
return "/WEB-INF/views/user/list.jsp";
}
} より洗練された実装として、リフレクションを使用してコマンドを動的に生成する方法があります。
@WebServlet("/*")
public class FrontControllerServlet extends HttpServlet {

    protected void service(HttpServletRequest request, HttpServletResponse response)
            throws ServletException, IOException {

        String path = request.getPathInfo();
        String commandClassName = "com.example.web.command." +
            Character.toUpperCase(path.charAt(1)) + path.substring(2) + "Command";

        try {
            Class commandClass = Class.forName(commandClassName);
            Command command = (Command) commandClass.newInstance();

            String viewPath = command.execute(request, response);
            RequestDispatcher dispatcher = request.getRequestDispatcher(viewPath);
            dispatcher.forward(request, response);

        } catch (ClassNotFoundException e) {
            response.sendError(HttpServletResponse.SC_NOT_FOUND);
        } catch (Exception e) {
            throw new ServletException("Error processing request", e);
        }
    }
}protected void service(HttpServletRequest request, HttpServletResponse response)
throws ServletException, IOException {
// 認証が必要なリクエストかチェック
if (requiresAuthentication(request) && !isAuthenticated(request)) {
response.sendRedirect("/login");
return;
}
// 通常の処理
super.service(request, response);
}
private boolean requiresAuthentication(HttpServletRequest request) {
String path = request.getPathInfo();
return !path.startsWith("/public") && !path.equals("/login");
}
private boolean isAuthenticated(HttpServletRequest request) {
HttpSession session = request.getSession(false);
return session != null && session.getAttribute("user") != null;
}protected void service(HttpServletRequest request, HttpServletResponse response)
throws ServletException, IOException {
try {
super.service(request, response);
} catch (BusinessException e) {
request.setAttribute("error", e.getMessage());
request.getRequestDispatcher("/WEB-INF/views/error/businessError.jsp")
.forward(request, response);
} catch (Exception e) {
log.error("Unexpected error", e);
response.sendError(HttpServletResponse.SC_INTERNAL_SERVER_ERROR);
}
}既存のモデル2アプリケーションをフロントコントローラーに移行する手順:
   // Before
   @WebServlet("/user/list")
   public class UserListServlet extends HttpServlet { ... }

   // After
public class UserListCommand implements Command { ... }<!-- commands.xml -->
<commands>
<command path="/user/list" class="com.example.web.command.UserListCommand"/>
<command path="/user/add" class="com.example.web.command.UserAddCommand"/>
</commands>// 設定ファイルから読み込み
DocumentBuilderFactory factory = DocumentBuilderFactory.newInstance();
DocumentBuilder builder = factory.newDocumentBuilder();
Document doc = builder.parse(new File("commands.xml"));
NodeList nodes = doc.getElementsByTagName("command");
for (int i = 0; i < nodes.getLength(); i++) {
Element element = (Element) nodes.item(i);
String path = element.getAttribute("path");
String className = element.getAttribute("class");
commands.put(path, (Command)Class.forName(className).newInstance());
}@CommandMapping("/user/list")
public class UserListCommand implements Command {
// ...
}// アノテーションをスキャンして自動登録
Reflections reflections = new Reflections("com.example.web.command");
Set> annotated = reflections.getTypesAnnotatedWith(CommandMapping.class);
for (Class clazz : annotated) {
CommandMapping mapping = clazz.getAnnotation(CommandMapping.class);
commands.put(mapping.value(), (Command)clazz.newInstance());
} 現代的なJava Webフレームワークの多くは、内部でフロントコントローラーパターンを採用しています。
@Controller
public class UserController {
    @GetMapping("/user/list")
    public String listUsers(Model model) {
        model.addAttribute("users", userService.getAllUsers());
        return "user/list";
    }
}フロントコントローラーパターンは、Java Webアプリケーションのアーキテクチャを次のレベルに引き上げる強力な設計パターンです。このパターンを習得することで、以下のようなメリットが得られます。
最初は少し複雑に感じるかもしれませんが、小さなプロジェクトから始めて徐々に慣れていくことをお勧めします。フロントコントローラーをマスターすると、Spring MVCなどの現代的なフレームワークの内部動作も自然に理解できるようになります。
フロントコントローラーをさらに発展させるために、以下のトピックを学習することをお勧めします。
フロントコントローラーパターンは、プロフェッショナルなJava Web開発者になるための重要なステップです。実際のプロジェクトで実践しながら、その真価を体感してください。