
イベント処理の基本(ActionListenerなど)
Swingアプリケーションにインタラクティブ性を追加するためには、イベント処理の仕組みを理解する必要があります。ユーザーの操作(ボタンクリック、キー入力など)に […]
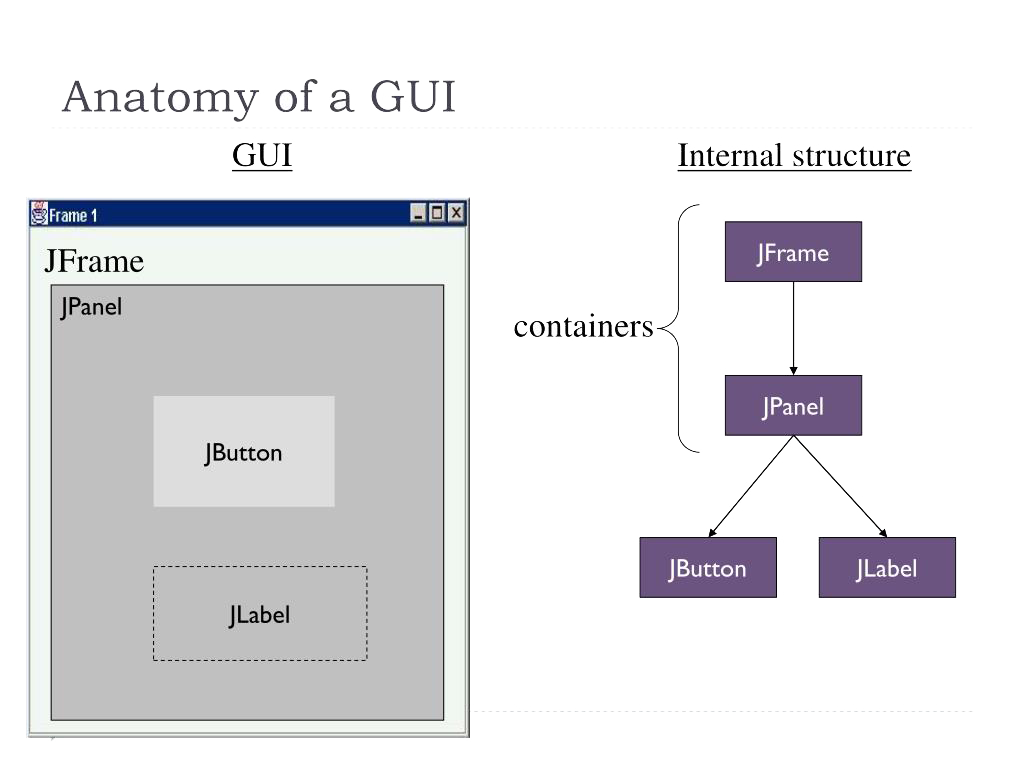
JFrameに直接コンポーネントを追加するだけでなく、JPanelを活用することでより柔軟なレイアウトが可能になります。JPanelはコンポーネントをグループ化するための軽量コンテナで、レイアウト管理や視覚的な区分けに役立ちます。
import javax.swing.*;
import java.awt.*;

public class PanelBasicExample {
    public static void main(String[] args) {
        SwingUtilities.invokeLater(() -> {
            JFrame frame = new JFrame("JPanel基本例");
            frame.setSize(400, 300);
            frame.setDefaultCloseOperation(JFrame.EXIT_ON_CLOSE);

            // メインパネルの作成
            JPanel mainPanel = new JPanel();
            mainPanel.setLayout(new BorderLayout()); // レイアウトマネージャー設定

            // 上部パネル(NORTH領域)
            JPanel topPanel = new JPanel();
            topPanel.add(new JLabel("上部パネル"));
            topPanel.setBackground(new Color(220, 220, 255)); // 背景色設定

            // 中央パネル(CENTER領域)
            JPanel centerPanel = new JPanel();
            centerPanel.add(new JButton("中央ボタン"));
            centerPanel.setBorder(BorderFactory.createLineBorder(Color.GRAY)); // ボーダー設定

            // コンポーネントをメインパネルに追加
            mainPanel.add(topPanel, BorderLayout.NORTH);
            mainPanel.add(centerPanel, BorderLayout.CENTER);

            // メインパネルをフレームに追加
            frame.add(mainPanel);
            frame.setVisible(true);
        });
    }
}import javax.swing.*;
import java.awt.*;
import java.awt.event.ActionEvent;
import java.awt.event.ActionListener;
public class PanelPracticalExample {
public static void main(String[] args) {
SwingUtilities.invokeLater(() -> {
JFrame frame = new JFrame("ログイン画面");
frame.setSize(350, 250);
frame.setDefaultCloseOperation(JFrame.EXIT_ON_CLOSE);
// メインパネル(全体のレイアウト用)
JPanel mainPanel = new JPanel(new BorderLayout(10, 10));
mainPanel.setBorder(BorderFactory.createEmptyBorder(20, 20, 20, 20));
// タイトルパネル(上部)
JPanel titlePanel = new JPanel();
JLabel titleLabel = new JLabel("システムログイン");
titleLabel.setFont(new Font("Meiryo", Font.BOLD, 18));
titlePanel.add(titleLabel);
// 入力フォームパネル(中央)
JPanel formPanel = new JPanel(new GridLayout(4, 1, 5, 5));
// ユーザー名入力
JPanel userPanel = new JPanel(new FlowLayout(FlowLayout.LEFT));
userPanel.add(new JLabel("ユーザー名:"));
JTextField userField = new JTextField(15);
userPanel.add(userField);
// パスワード入力
JPanel passPanel = new JPanel(new FlowLayout(FlowLayout.LEFT));
passPanel.add(new JLabel("パスワード:"));
JPasswordField passField = new JPasswordField(15);
passPanel.add(passField);
formPanel.add(userPanel);
formPanel.add(passPanel);
// ボタンパネル(下部)
JPanel buttonPanel = new JPanel(new FlowLayout(FlowLayout.RIGHT));
JButton loginButton = new JButton("ログイン");
JButton cancelButton = new JButton("キャンセル");
// ログインボタンのアクション
loginButton.addActionListener(new ActionListener() {
@Override
public void actionPerformed(ActionEvent e) {
String username = userField.getText();
char[] password = passField.getPassword();
// 簡易認証(実際には適切な認証処理が必要)
if (username.equals("admin") && new String(password).equals("password")) {
JOptionPane.showMessageDialog(frame, "ログイン成功!");
} else {
JOptionPane.showMessageDialog(frame,
"ユーザー名またはパスワードが不正です",
"エラー",
JOptionPane.ERROR_MESSAGE);
}
}
});
buttonPanel.add(loginButton);
buttonPanel.add(cancelButton);
// メインパネルに各パネルを追加
mainPanel.add(titlePanel, BorderLayout.NORTH);
mainPanel.add(formPanel, BorderLayout.CENTER);
mainPanel.add(buttonPanel, BorderLayout.SOUTH);
frame.add(mainPanel);
frame.setVisible(true);
});
}
}JPanel panel = new JPanel();
panel.setBackground(Color.LIGHT_GRAY);// 線ボーダー
panel.setBorder(BorderFactory.createLineBorder(Color.BLUE));
// タイトル付きボーダー
panel.setBorder(BorderFactory.createTitledBorder("設定項目"));
// 複合ボーダー
Border lineBorder = BorderFactory.createLineBorder(Color.RED);
Border emptyBorder = BorderFactory.createEmptyBorder(5, 5, 5, 5);
panel.setBorder(BorderFactory.createCompoundBorder(lineBorder, emptyBorder));// GridLayout (行, 列, 水平間隔, 垂直間隔)
panel.setLayout(new GridLayout(2, 3, 5, 5));
// FlowLayout (配置, 水平間隔, 垂直間隔)
panel.setLayout(new FlowLayout(FlowLayout.LEFT, 10, 10));import javax.swing.*;
import java.awt.*;
public class NestedPanelExample {
public static void main(String[] args) {
SwingUtilities.invokeLater(() -> {
JFrame frame = new JFrame("ネストしたパネル例");
frame.setSize(500, 400);
frame.setDefaultCloseOperation(JFrame.EXIT_ON_CLOSE);
// メインパネル(BorderLayout)
JPanel mainPanel = new JPanel(new BorderLayout(5, 5));
mainPanel.setBorder(BorderFactory.createEmptyBorder(10, 10, 10, 10));
// ヘッダーパネル(NORTH)
JPanel headerPanel = new JPanel();
headerPanel.setBackground(new Color(200, 230, 255));
headerPanel.add(new JLabel("アプリケーションタイトル"));
// コンテンツパネル(CENTER - GridLayout)
JPanel contentPanel = new JPanel(new GridLayout(1, 2, 10, 0));
// 左サイドバー
JPanel leftPanel = new JPanel(new GridLayout(3, 1, 0, 5));
leftPanel.setBorder(BorderFactory.createTitledBorder("メニュー"));
leftPanel.add(new JButton("ホーム"));
leftPanel.add(new JButton("設定"));
leftPanel.add(new JButton("ヘルプ"));
// 右メインコンテンツ
JPanel rightPanel = new JPanel(new BorderLayout());
rightPanel.setBorder(BorderFactory.createTitledBorder("コンテンツ"));
rightPanel.add(new JTextArea(10, 30), BorderLayout.CENTER);
contentPanel.add(leftPanel);
contentPanel.add(rightPanel);
// フッターパネル(SOUTH)
JPanel footerPanel = new JPanel(new FlowLayout(FlowLayout.RIGHT));
footerPanel.add(new JLabel("Copyright © 2023"));
// メインパネルに追加
mainPanel.add(headerPanel, BorderLayout.NORTH);
mainPanel.add(contentPanel, BorderLayout.CENTER);
mainPanel.add(footerPanel, BorderLayout.SOUTH);
frame.add(mainPanel);
frame.setVisible(true);
});
}
}JPanelを活用することで、複雑なレイアウトでもコードを整理しながら構築できます。次の章で学ぶ「レイアウトマネージャーの基礎」と組み合わせることで、よりプロフェッショナルなGUIを作成できるようになります。