
変数とデータ型(let, const, プリミティブ型)
はじめに JavaScriptを学ぶ上で、変数とデータ型の理解は基礎中の基礎です。この知識なしでは効果的なプログラミングはできません。現代のJavaScript […]
現代のWeb開発において、外部APIとの連携はほぼ必須のスキルです。この章では、JavaScriptを使って外部APIと通信する方法を、初心者の方にもわかりやすく詳細に解説します。
API連携の基本概念から、実際のコード例、エラー処理、ベストプラクティスまで、実践的な知識を身につけましょう。
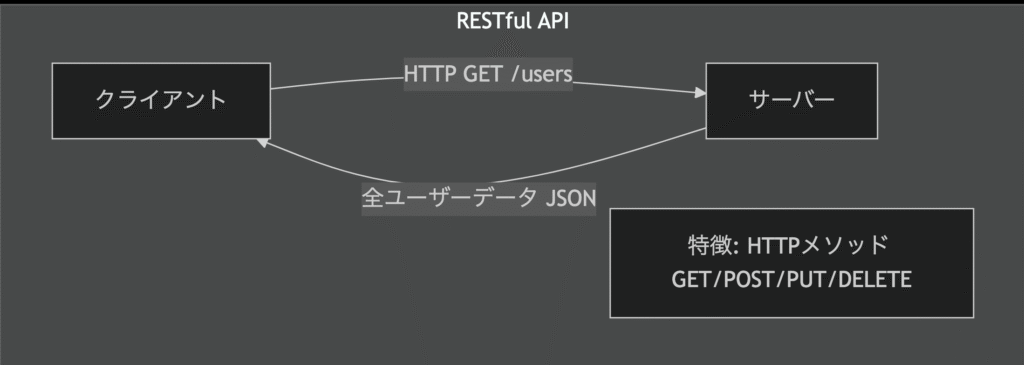
API(Application Programming Interface)は、ソフトウェア同士が通信するためのインターフェースです。Web APIはHTTPプロトコルを使用してデータをやり取りします。
HTTPメソッドで操作を表現し、JSON形式でデータを交換します。
シンプルでキャッシュ可能な設計が特徴で、多くのWebサービスで採用されています。
※HTTPは「Hypertext Transfer Protocol」の略です。
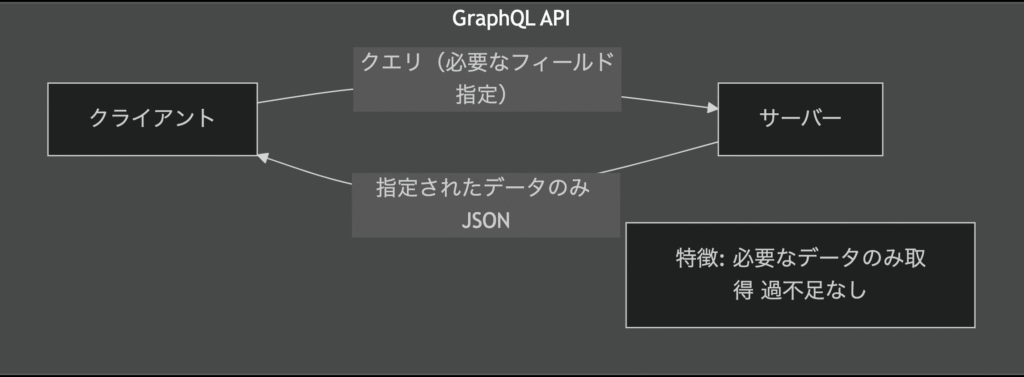
クライアントが必要なデータ構造を指定できるクエリ言語です。
過剰取得や不足取得を防ぎ、フロントエンドの要求に柔軟に対応できます。
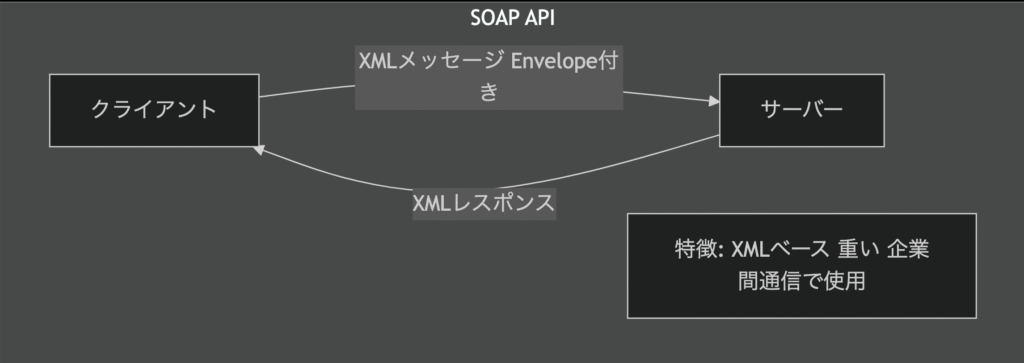
XMLをベースにした企業向けの堅牢なプロトコルです。
複雑な仕様と重い処理のため、現代のWeb開発ではあまり使用されなくなりました。
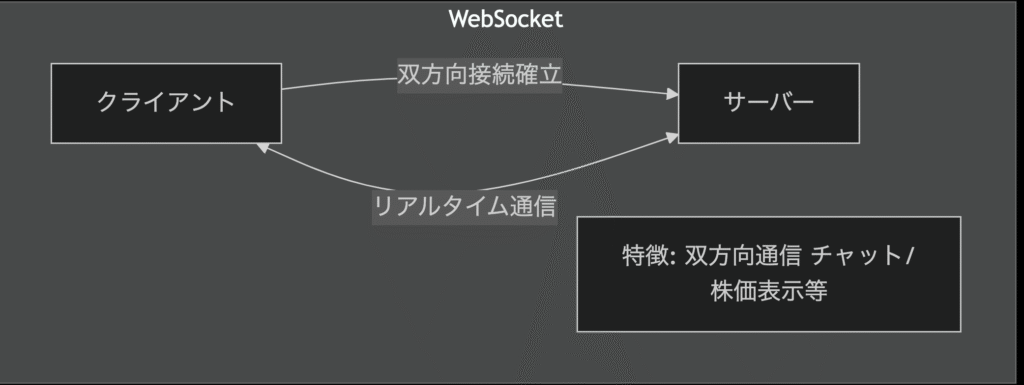
単一の接続で双方向のリアルタイム通信を実現します。
チャットやライブ更新など、即時性が求められるアプリケーションで活用されます。
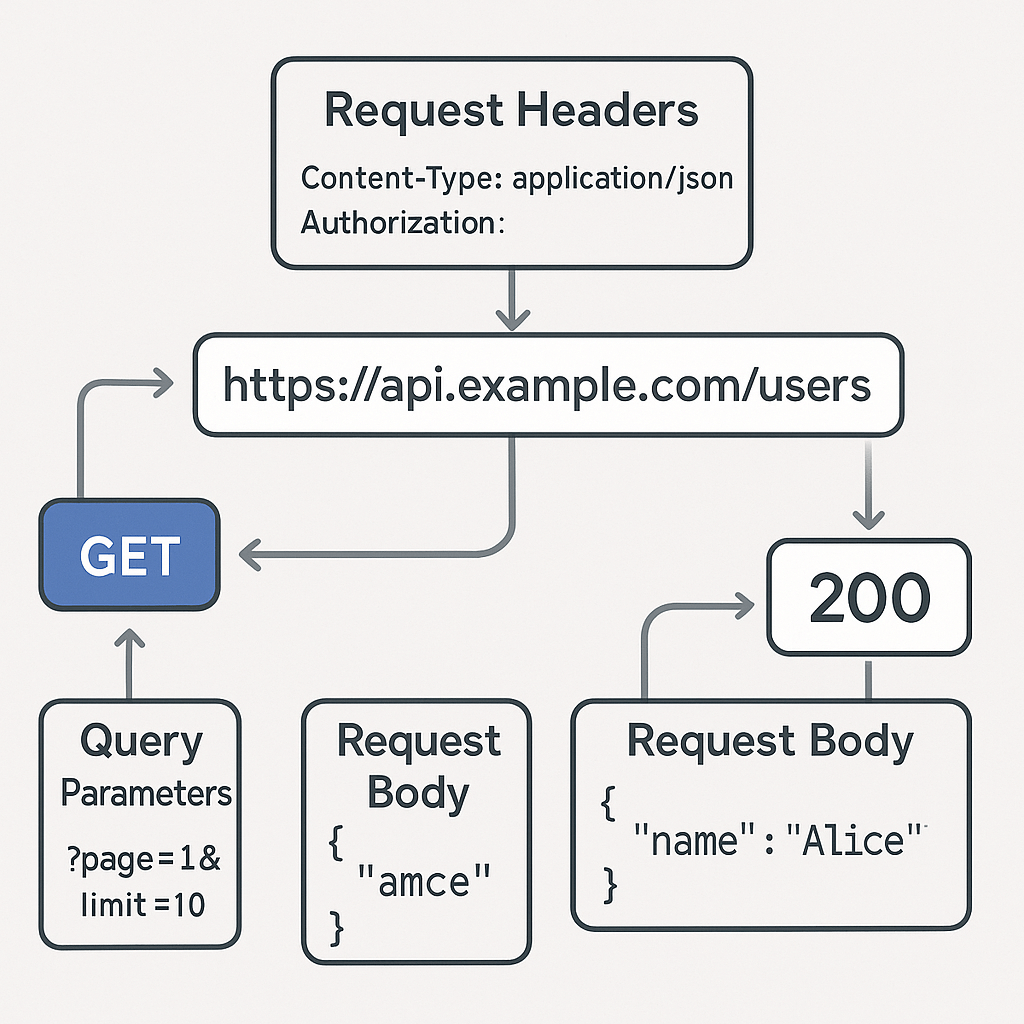
APIにアクセスするための住所のようなもので、特定の機能やリソースを指定するURLです。
APIが提供する特定の機能へのアクセスポイントです。
例: https://api.example.com/users
リソースに対する操作の種類を示す命令で、代表的なものにGET(取得)、POST(作成)、PUT(更新)、DELETE(削除)があります。
リクエストに付随する追加情報で、認証情報やデータ形式(例:Content-Type, Authorization)などを指定します。
Content-Type: データ形式(application/jsonなど)Authorization: 認証トークンAccept: 受け入れ可能なレスポンス形式POSTやPUTなどで送信するデータの本体で、JSONやXMLなどの形式でサーバーに渡されます。
URLの「?」以降に記述される追加情報で、検索条件やページ番号などを指定するために使われます。
URLの末尾に追加するパラメータです。
例: ?page=1&limit=10
サーバーからのレスポンス結果を数値で表したもの。200番台は成功、400番台はクライアントエラー、500番台はサーバーエラーを意味します。
現代のJavaScriptでは、fetch APIが標準的なHTTPリクエストの方法です。
fetchUsers関数では、fetchでhttps://jsonplaceholder.typicode.com/usersにリクエストを送り、レスポンスのokを確認してHTTPエラーを検出します。正常時はawait response.json()でデータを取得し、結果をコンソールに出力して返します。エラーが発生した場合はcatchで補足し、メッセージを出力して再スローします。呼び出し側では.then()を使って処理完了後の動作を記述しています。
async function fetchUsers() {
  try {
    const response = await fetch('https://jsonplaceholder.typicode.com/users');

    if (!response.ok) {
      throw new Error(`HTTP error! status: ${response.status}`);
    }

    const users = await response.json();
    console.log('取得したユーザー:', users);
    return users;
  } catch (error) {
    console.error('ユーザー取得に失敗:', error);
    throw error;
  }
}

fetchUsers().then(users => console.log('処理完了'));createUser関数では、fetchの第2引数でHTTPメソッドをPOSTに指定し、headersでContent-Typeをapplication/jsonに設定、bodyでuserDataをJSON文字列として送信します。
レスポンスのokを確認して問題があればエラーを投げ、正常時はresponse.json()でサーバーから返された新しいユーザー情報を取得し、コンソールに出力します。
最後に、newUserオブジェクトを引数に関数を呼び出して、ユーザー登録を実行しています。
async function createUser(userData) {
  try {
    const response = await fetch('https://jsonplaceholder.typicode.com/users', {
      method: 'POST',
      headers: {
        'Content-Type': 'application/json',
      },
      body: JSON.stringify(userData),
    });

    if (!response.ok) {
      throw new Error(`HTTP error! status: ${response.status}`);
    }

    const newUser = await response.json();
    console.log('作成されたユーザー:', newUser);
    return newUser;
  } catch (error) {
    console.error('ユーザー作成に失敗:', error);
    throw error;
  }
}

const newUser = {
  name: 'John Doe',
  email: 'john@example.com'
};

createUser(newUser);多くのAPIは認証が必要です。主な認証方法以下のとおりです。
利用者を識別するための文字列で、アクセス制御や利用状況の管理に使われます。fetchWeather関数は、WeatherAPIのエンドポイントにfetchでリクエストを送り、APIキーと都市名をクエリパラメータとして渡します。
awaitによってレスポンスを待機し、その後にJSON解析やデータ処理を行うことが想定されています。async/await構文を使うことで、非同期通信をシンプルかつ読みやすく記述できます。
const apiKey = 'your_api_key_here';

async function fetchWeather(city) {
  const response = await fetch(
    `https://api.weatherapi.com/v1/current.json?key=${apiKey}&q=${city}`
  );
  // ...
}認証済みユーザーであることを示すトークンで、リクエストヘッダーに設定してアクセスを許可します。fetchProtectedData関数では、fetchの第2引数でheadersを指定し、AuthorizationヘッダーにBearerトークンを設定しています。
これにより、認証済みユーザーとしてhttps://api.example.com/protectedにリクエストを送信できます。awaitでレスポンスの完了を待ち、続いてJSON変換やエラーハンドリングなどを行う処理を追加することが想定されています。
const token = 'your_token_here';

async function fetchProtectedData() {
  const response = await fetch('https://api.example.com/protected', {
    headers: {
      'Authorization': `Bearer ${token}`
    }
  });
  // ...
}
JWTトークン(JSON Web Token)とは、ユーザーの認証情報などを安全にやり取りするためのデジタル署名付きトークンです。
// 簡易的なBase64エンコード(実際のJWTライブラリを使用してください)
function base64Encode(str) {
  return btoa(unescape(encodeURIComponent(str)));
}

// JWTトークン生成の簡易例
function generateSimpleJWT(payload, secret) {
  const header = {
    alg: 'HS256',
    typ: 'JWT'
  };

  const encodedHeader = base64Encode(JSON.stringify(header));
  const encodedPayload = base64Encode(JSON.stringify(payload));

  // 実際の署名処理は省略(ライブラリを使用)
  const signature = 'simulated_signature';

  return `${encodedHeader}.${encodedPayload}.${signature}`;
}

// 使用例
const userPayload = {
  userId: 12345,
  username: 'john_doe',
  exp: Math.floor(Date.now() / 1000) + (60 * 60) // 1時間後
};

const jwtToken = generateSimpleJWT(userPayload, 'secret_key');
console.log('生成されたJWT:', jwtToken);ユーザーがパスワードを共有せずに、サードパーティアプリケーションにリソースへの限定的なアクセス権を許可するための認可フレームワークです。ユーザーのパスワードを共有せずにAPIアクセスを可能にします。
バックエンド(Node.js + Express)
const express = require('express');
const axios = require('axios');
const app = express();

// OAuth設定
const OAUTH_CONFIG = {
  clientId: 'your-client-id',
  clientSecret: 'your-client-secret',
  redirectUri: 'http://localhost:3000/callback',
  authUrl: 'https://provider.com/oauth/authorize',
  tokenUrl: 'https://provider.com/oauth/token',
  userInfoUrl: 'https://provider.com/userinfo'
};

// 認可開始
app.get('/auth', (req, res) => {
  const authUrl = `${OAUTH_CONFIG.authUrl}?` +
    `client_id=${OAUTH_CONFIG.clientId}&` +
    `redirect_uri=${encodeURIComponent(OAUTH_CONFIG.redirectUri)}&` +
    `response_type=code&` +
    `scope=read:user`;

  res.redirect(authUrl);
});

// コールバック処理
app.get('/callback', async (req, res) => {
  const { code } = req.query;

  try {
    // 認可コードをアクセストークンと交換
    const tokenResponse = await axios.post(OAUTH_CONFIG.tokenUrl, {
      client_id: OAUTH_CONFIG.clientId,
      client_secret: OAUTH_CONFIG.clientSecret,
      redirect_uri: OAUTH_CONFIG.redirectUri,
      code: code,
      grant_type: 'authorization_code'
    });

    const accessToken = tokenResponse.data.access_token;

    // ユーザー情報を取得
    const userResponse = await axios.get(OAUTH_CONFIG.userInfoUrl, {
      headers: { 'Authorization': `Bearer ${accessToken}` }
    });

    res.json({ user: userResponse.data });
  } catch (error) {
    res.status(500).json({ error: 'OAuth failed' });
  }
});

app.listen(3000, () => console.log('Server running on port 3000'));
フロントエンド
class OAuthClient {
  constructor(clientId, redirectUri) {
    this.clientId = clientId;
    this.redirectUri = redirectUri;
  }

  // OAuthフロー開始
  startOAuth() {
    const authUrl = `https://provider.com/oauth/authorize?` +
      `client_id=${this.clientId}&` +
      `redirect_uri=${encodeURIComponent(this.redirectUri)}&` +
      `response_type=code&` +
      `scope=profile%20email`;

    window.location.href = authUrl;
  }

  // トークン取得
  async getToken(authorizationCode) {
    const response = await fetch('/api/exchange-token', {
      method: 'POST',
      headers: { 'Content-Type': 'application/json' },
      body: JSON.stringify({ code: authorizationCode })
    });

    return await response.json();
  }
}

// 使用例
const oauth = new OAuthClient(
  'your-client-id',
  'http://localhost:3000/callback'
);

// URLから認可コードを取得
const urlParams = new URLSearchParams(window.location.search);
const authCode = urlParams.get('code');

if (authCode) {
  // トークン取得とユーザー情報表示
  oauth.getToken(authCode)
    .then(data => console.log('User data:', data))
    .catch(error => console.error('OAuth error:', error));
}APIを利用する際には、まずアクセスできるエンドポイントを確認し、リクエストに含めるべき必要なパラメータを把握することが重要です。また、認証方法によってアクセス制限が設けられている場合があり、適切なトークンやキーを送信する必要があります。さらに、一定時間内のリクエスト回数を制限するレートリミットに注意し、APIの応答内容は通常、レスポンスの形式(例:JSONやXML)として定義されています。
API_BASE_URLに'https://api.example.com/v1'を代入することで、他の箇所でエンドポイントを組み立てる際に同じ基準URLを再利用できるようになります。これにより、保守性が向上し、APIのバージョン変更やドメイン変更にも簡単に対応できます。
const API_BASE_URL = 'https://api.example.com/v1';makeApiRequest関数は、エンドポイント名・HTTPメソッド・リクエストボディを受け取り、API_BASE_URLと結合して完全なURLを生成します。AuthorizationヘッダーにはlocalStorageから取得したJWTトークンを付与し、認証付きリクエストを送信します。
async function makeApiRequest(endpoint, method = 'GET', body = null) {
  const url = `${API_BASE_URL}${endpoint}`;
  const options = {
    method,
    headers: {
      'Content-Type': 'application/json',
      'Authorization': `Bearer ${localStorage.getItem('token')}`
    },
  };

  if (body) {
    options.body = JSON.stringify(body);
  }

  try {
    const response = await fetch(url, options);

    if (response.status === 401) {
      // 認証エラー処理
      handleUnauthorized();
      throw new Error('認証が必要です');
    }

    if (!response.ok) {
      const errorData = await response.json();
      throw new Error(errorData.message || 'リクエストに失敗しました');
    }

    return await response.json();
  } catch (error) {
    console.error(`APIリクエストエラー (${method} ${endpoint}):`, error);
    throw error;
  }
}レスポンスのstatusが401なら認証エラーとしてhandleUnauthorized()を呼び出し、それ以外でokがfalseの場合はエラーメッセージを返します。正常時はresponse.json()でレスポンスデータを返し、すべてのエラーはcatchブロックで補足して詳細をコンソールに出力します。
このような構成により、API通信を一元管理し、エラー処理・認証処理を共通化できます。
次のコードは、共通のAPIリクエスト関数makeApiRequestを活用して、ユーザー関連の操作をシンプルに定義した例です。
getUsers() は、/usersエンドポイントにGETリクエストを送り、ユーザー一覧を取得します。getUser(id) は、/users/{id}エンドポイントから特定ユーザーの情報を取得します。createUser(userData) は、/usersにPOSTリクエストを送り、引数のuserData(例:名前やメールアドレスなど)をJSON形式で送信して新しいユーザーを作成します。// ユーザー一覧取得
async function getUsers() {
return makeApiRequest('/users');
}
// 特定ユーザー取得
async function getUser(id) {
return makeApiRequest(`/users/${id}`);
}
// ユーザー作成
async function createUser(userData) {
return makeApiRequest('/users', 'POST', userData);
}このように関数を分けることで、API通信の重複を避け、可読性と保守性を高めています。
CORSエラーとは、異なるドメイン間での通信がブラウザによって制限されることで発生するエラーです。たとえば、example.comのページからapi.another.comへリクエストを送ると、サーバー側で適切なCORS設定(Access-Control-Allow-Originヘッダーなど)がされていない場合、ブラウザが安全のために通信をブロックします。
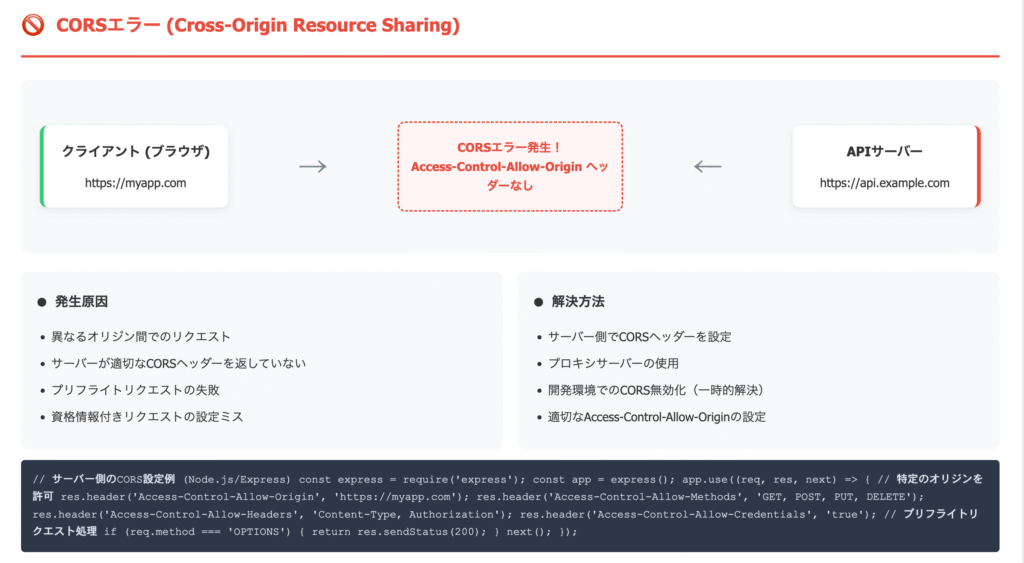
解決策:
fetch(url, {
  mode: 'cors' // または 'no-cors'(制限あり)
});
mode: 'cors'を指定すると、異なるドメインへのリクエストが可能になりますが、サーバー側で適切なCORS設定(Access-Control-Allow-Originなど)が必要です。
一方、'no-cors'を指定すると制限付きで通信できますが、レスポンス内容にアクセスできないなど、機能が大きく制限されます。
レートリミット(Rate Limit)とは、一定時間内に送信できるリクエスト数を制限する仕組みのことです。APIなどで過剰なアクセスを防ぎ、サーバーの負荷を軽減するために導入されます。例えば「1分間に最大100回までリクエスト可能」といった制限があり、超えるとエラー(多くはHTTPステータス429 Too Many Requests)が返されます。
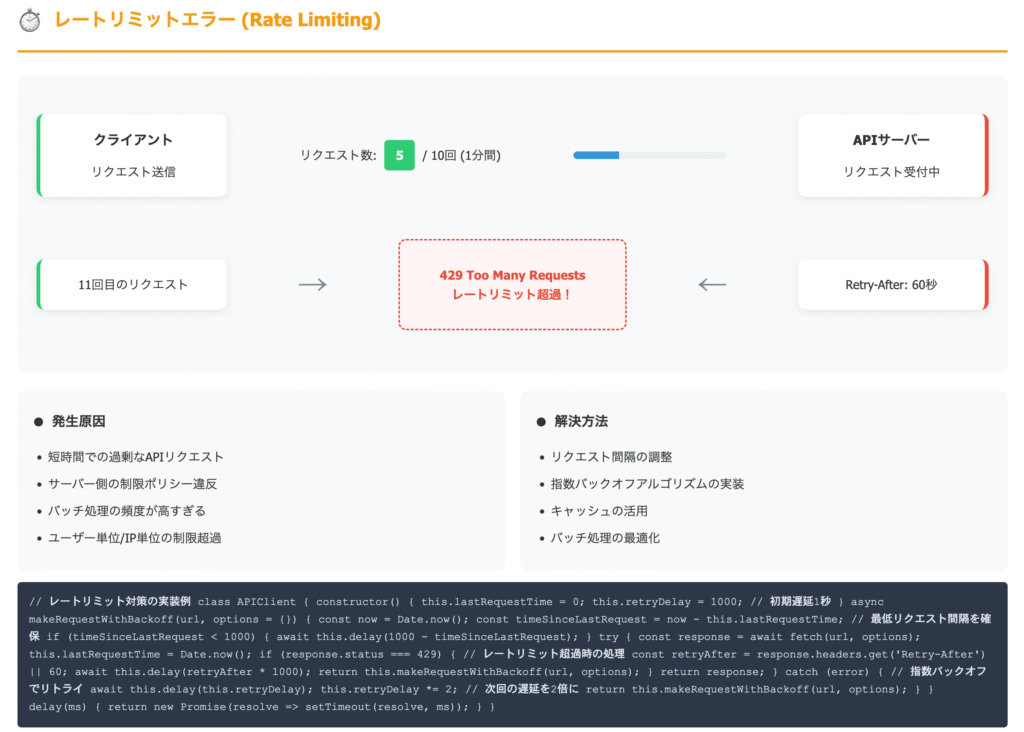
解決策:
async function fetchWithRetry(url, retries = 3) {
  try {
    const response = await fetch(url);
    return response;
  } catch (error) {
    if (retries <= 0) throw error;
    await new Promise(resolve => setTimeout(resolve, 1000));
    return fetchWithRetry(url, retries - 1);
  }
}fetchWithRetryは指定したurlに対してfetchを実行し、通信エラーが発生した場合に最大retries回まで再試行します。エラー時は1秒(setTimeout)待機してから再び呼び出し、リトライ回数が0になるとエラーを投げます。一時的なネットワーク障害やサーバー不安定時に再試行することで、処理の信頼性を高めることができます。
ネットワーク遅延や応答のないAPIへの対処としては、タイムアウト処理を設定して一定時間でリクエストを中断し、リトライ機能で再試行する方法が一般的です。また、ユーザーにエラーメッセージを表示したり、フォールバック処理で代替データを提示するなどの対策も有効です。
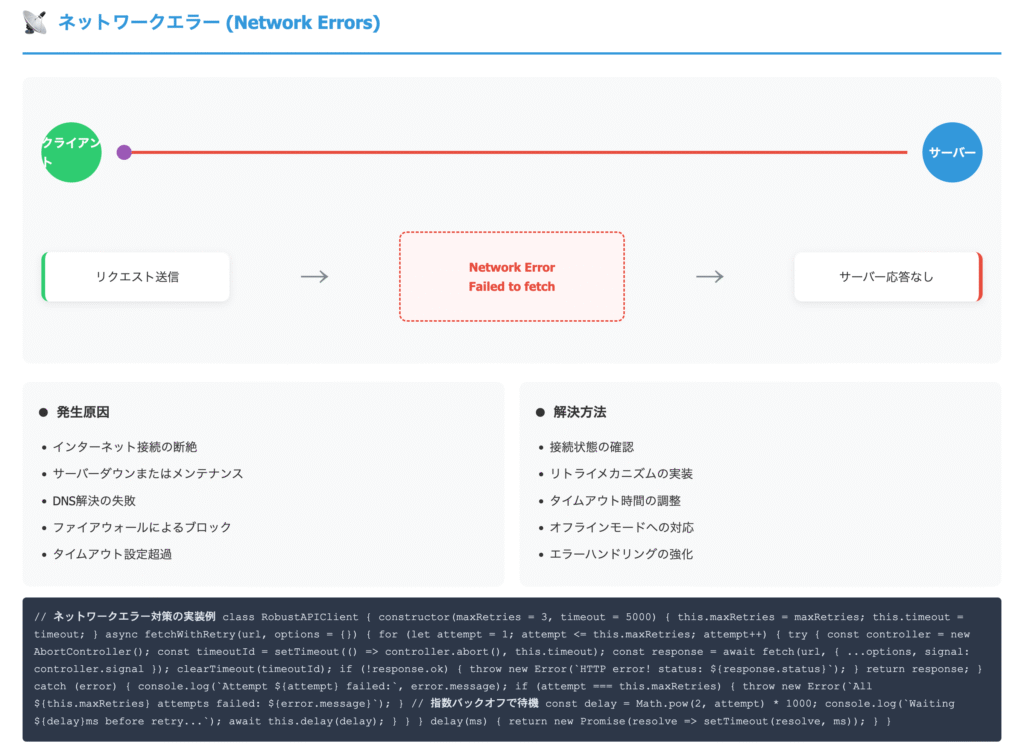
解決策:
async function fetchWithTimeout(url, timeout = 5000) {
  const controller = new AbortController();
  const timeoutId = setTimeout(() => controller.abort(), timeout);

  try {
    const response = await fetch(url, {
      signal: controller.signal
    });
    clearTimeout(timeoutId);
    return response;
  } catch (error) {
    clearTimeout(timeoutId);
    throw error;
  }
}AbortControllerを使って、指定した時間(デフォルト5秒)以内にレスポンスが返らない場合、自動的にリクエストを中断(abort())します。成功・失敗いずれの場合もclearTimeout()でタイマーを解除し、エラー時は例外をスローします。これにより、ネットワーク遅延や応答のないAPIに対して無限に待ち続けることを防げます。
次のコードは、OpenWeatherMap APIを利用して都市の天気情報を取得するクラス設計の例です。
WeatherApiクラスはAPIキーを受け取り、基本URLを設定します。getCurrentWeather(city)メソッドでは、指定した都市名でAPIにリクエストを送り、温度などの天気データをJSON形式で取得します。
レスポンスが正常でない場合は、getErrorMessage()を呼び出してエラー内容を解析し、適切なメッセージを返します。
class WeatherApi {
  constructor(apiKey) {
    this.apiKey = apiKey;
    this.baseUrl = 'https://api.openweathermap.org/data/2.5';
  }

  async getCurrentWeather(city) {
    const response = await fetch(
      `${this.baseUrl}/weather?q=${city}&appid=${this.apiKey}&units=metric`
    );

    if (!response.ok) {
      throw new Error(await this.getErrorMessage(response));
    }

    return await response.json();
  }

  async getErrorMessage(response) {
    try {
      const errorData = await response.json();
      return errorData.message || '天気情報の取得に失敗しました';
    } catch {
      return `HTTPエラー: ${response.status}`;
    }
  }
}

// 使用例
const weatherApi = new WeatherApi('your_api_key');

async function displayWeather() {
  try {
    const weather = await weatherApi.getCurrentWeather('Tokyo');
    console.log(`東京の気温: ${weather.main.temp}°C`);
  } catch (error) {
    console.error('エラー:', error.message);
  }
}

displayWeather();使用例ではWeatherApiをインスタンス化し、displayWeather()関数で東京の気温を取得してコンソールに表示します。try...catchによって通信エラーやAPIエラーを安全に処理できる、実用的で再利用性の高い構成になっています。
外部APIとの連携は現代のWeb開発に欠かせず、標準的にはfetch APIが利用されます。その際は適切なエラーハンドリングや認証への対応が必要で、CORSといったセキュリティ制約の理解も欠かせません。
コードは整理して再利用しやすく設計し、パフォーマンスとセキュリティを意識することが重要です。最終的にはAPIドキュメントを正しく理解することが成功の鍵となります。
API連携をマスターすると、外部サービスと連携した豊かなアプリケーションを作成できるようになります。
以下のfetchリクエストにはいくつかの問題があります。それを指摘し、修正したコードを書いてください。
async function getPosts() {
  const response = fetch('https://jsonplaceholder.typicode.com/posts');
  const posts = response.json();
  return posts;
}次のAPI連携に関する記述について、正しいものには○、間違っているものには×をつけてください。
以下の要件を満たすAPIクライアントクラスを作成してください。
問題点:
awaitの欠如(fetchとjson()の両方)修正コード:
async function getPosts() {
  try {
    const response = await fetch('https://jsonplaceholder.typicode.com/posts');

    if (!response.ok) {
      throw new Error(`HTTP error! status: ${response.status}`);
    }

    const posts = await response.json();
    return posts;
  } catch (error) {
    console.error('投稿の取得に失敗:', error);
    throw error;
  }
}class ApiClient {
constructor(baseUrl, authToken) {
this.baseUrl = baseUrl;
this.authToken = authToken;
}
async request(endpoint, method = 'GET', body = null) {
const url = `${this.baseUrl}${endpoint}`;
const options = {
method,
headers: {
'Content-Type': 'application/json',
'Authorization': `Bearer ${this.authToken}`
}
};
if (body) {
options.body = JSON.stringify(body);
}
try {
const response = await fetch(url, options);
if (!response.ok) {
const errorData = await response.json().catch(() => ({}));
throw new Error(errorData.message || 'リクエストに失敗しました');
}
const contentType = response.headers.get('content-type');
if (!contentType || !contentType.includes('application/json')) {
throw new Error('無効なコンテンツタイプ');
}
return await response.json();
} catch (error) {
console.error(`APIリクエストエラー (${method} ${endpoint}):`, error);
throw error;
}
}
get(endpoint) {
return this.request(endpoint);
}
post(endpoint, body) {
return this.request(endpoint, 'POST', body);
}
put(endpoint, body) {
return this.request(endpoint, 'PUT', body);
}
delete(endpoint) {
return this.request(endpoint, 'DELETE');
}
}
// 使用例
const api = new ApiClient('https://api.example.com/v1', 'your_token');
// GETリクエスト
api.get('/users').then(users => console.log(users));
// POSTリクエスト
api.post('/users', { name: 'John' }).then(user => console.log(user));