
JFrameとJPanelの組み合わせ(基本コンポーネントの拡張)
JFrameに直接コンポーネントを追加するだけでなく、JPanelを活用することでより柔軟なレイアウトが可能になります。JPanelはコンポーネントをグループ化 […]
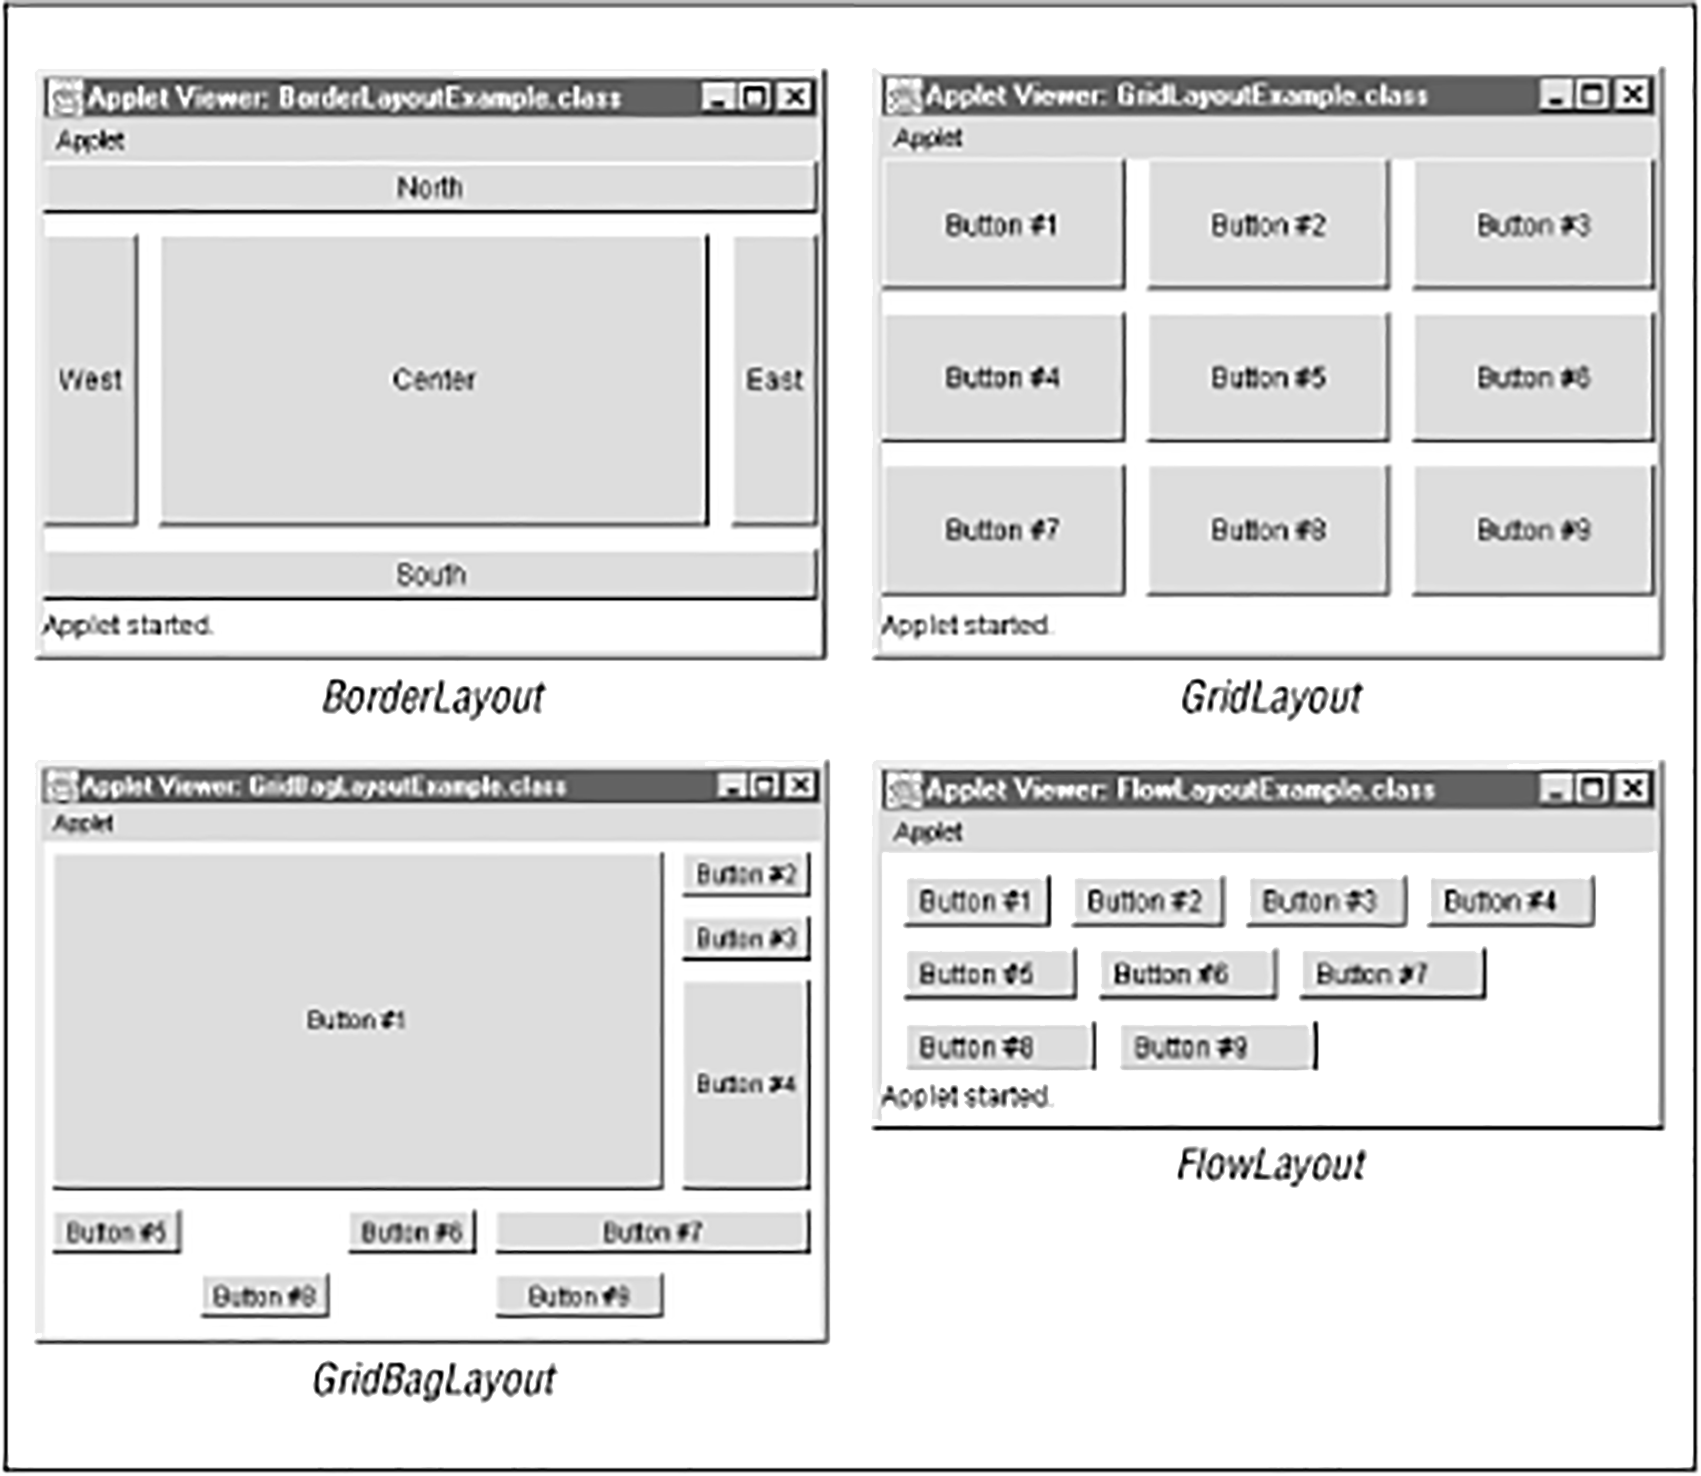
Swingのレイアウトマネージャーは、コンポーネントのサイズと位置を自動的に管理する仕組みです。適切なレイアウトマネージャーを使用することで、異なる画面サイズや解像度でも適切に表示されるGUIを作成できます。
特徴:
import javax.swing.*;
import java.awt.*;

public class BorderLayoutExample {
    public static void main(String[] args) {
        SwingUtilities.invokeLater(() -> {
            JFrame frame = new JFrame("BorderLayoutの例");
            frame.setSize(400, 300);
            frame.setDefaultCloseOperation(JFrame.EXIT_ON_CLOSE);

            // BorderLayoutの設定(水平間隔5、垂直間隔5)
            frame.setLayout(new BorderLayout(5, 5));

            // 各領域にコンポーネントを追加
            frame.add(new JButton("北"), BorderLayout.NORTH);
            frame.add(new JButton("南"), BorderLayout.SOUTH);
            frame.add(new JButton("東"), BorderLayout.EAST);
            frame.add(new JButton("西"), BorderLayout.WEST);
            frame.add(new JButton("中央"), BorderLayout.CENTER);

            frame.setVisible(true);
        });
    }
}特徴:
import javax.swing.*;
import java.awt.*;

public class FlowLayoutExample {
    public static void main(String[] args) {
        SwingUtilities.invokeLater(() -> {
            JFrame frame = new JFrame("FlowLayoutの例");
            frame.setSize(400, 300);
            frame.setDefaultCloseOperation(JFrame.EXIT_ON_CLOSE);

            // FlowLayoutの設定(中央揃え、水平間隔10、垂直間隔20)
            frame.setLayout(new FlowLayout(FlowLayout.CENTER, 10, 20));

            // 複数のボタンを追加
            for (int i = 1; i <= 10; i++) {
                frame.add(new JButton("ボタン " + i));
            }

            frame.setVisible(true);
        });
    }
}特徴:
import javax.swing.*;
import java.awt.*;

public class GridLayoutExample {
    public static void main(String[] args) {
        SwingUtilities.invokeLater(() -> {
            JFrame frame = new JFrame("GridLayoutの例");
            frame.setSize(400, 300);
            frame.setDefaultCloseOperation(JFrame.EXIT_ON_CLOSE);

            // GridLayoutの設定(2行3列、水平間隔5、垂直間隔5)
            frame.setLayout(new GridLayout(2, 3, 5, 5));

            // 6つのボタンを追加
            for (int i = 1; i <= 6; i++) {
                frame.add(new JButton("ボタン " + i));
            }

            frame.setVisible(true);
        });
    }
}特徴:
import javax.swing.*;
import java.awt.*;

public class GridBagLayoutExample {
    public static void main(String[] args) {
        SwingUtilities.invokeLater(() -> {
            JFrame frame = new JFrame("GridBagLayoutの例");
            frame.setSize(500, 400);
            frame.setDefaultCloseOperation(JFrame.EXIT_ON_CLOSE);

            JPanel panel = new JPanel(new GridBagLayout());
            GridBagConstraints gbc = new GridBagConstraints();

            // 共通設定
            gbc.fill = GridBagConstraints.HORIZONTAL;
            gbc.insets = new Insets(5, 5, 5, 5); // マージン

            // ラベル1 (0,0)
            gbc.gridx = 0;
            gbc.gridy = 0;
            panel.add(new JLabel("名前:"), gbc);

            // テキストフィールド1 (1,0)
            gbc.gridx = 1;
            gbc.gridwidth = 2; // 2列分占有
            panel.add(new JTextField(20), gbc);

            // ラベル2 (0,1)
            gbc.gridx = 0;
            gbc.gridy = 1;
            gbc.gridwidth = 1; // リセット
            panel.add(new JLabel("住所:"), gbc);

            // テキストフィールド2 (1,1)
            gbc.gridx = 1;
            gbc.gridwidth = 2;
            panel.add(new JTextField(20), gbc);

            // ボタン1 (1,2)
            gbc.gridx = 1;
            gbc.gridy = 2;
            gbc.gridwidth = 1;
            gbc.weightx = 0.5; // 余白の分配
            panel.add(new JButton("保存"), gbc);

            // ボタン2 (2,2)
            gbc.gridx = 2;
            panel.add(new JButton("キャンセル"), gbc);

            frame.add(panel);
            frame.setVisible(true);
        });
    }
}| レイアウト | 適したケース | 不向きなケース |
|---|---|---|
| BorderLayout | メインウィンドウの基本構造 | 複雑な配置 |
| FlowLayout | ツールバーや単純なボタン群 | 精密な配置 |
| GridLayout | フォームや均等配置が必要な場合 | 柔軟なレイアウト |
| GridBagLayout | 複雑で精密なレイアウト | 簡単な配置 |
import javax.swing.*;
import java.awt.*;

public class CombinedLayoutExample {
    public static void main(String[] args) {
        SwingUtilities.invokeLater(() -> {
            JFrame frame = new JFrame("レイアウト組み合わせ例");
            frame.setSize(600, 400);
            frame.setDefaultCloseOperation(JFrame.EXIT_ON_CLOSE);

            // メインパネル(BorderLayout)
            JPanel mainPanel = new JPanel(new BorderLayout(5, 5));

            // ヘッダーパネル(NORTH - FlowLayout)
            JPanel headerPanel = new JPanel(new FlowLayout(FlowLayout.CENTER));
            headerPanel.add(new JLabel("アプリケーションタイトル"));
            headerPanel.setBackground(new Color(220, 230, 240));

            // サイドバーパネル(WEST - GridLayout)
            JPanel sidePanel = new JPanel(new GridLayout(5, 1, 0, 10));
            sidePanel.setBorder(BorderFactory.createEmptyBorder(10, 10, 10, 10));
            sidePanel.add(new JButton("メニュー1"));
            sidePanel.add(new JButton("メニュー2"));
            sidePanel.add(new JButton("メニュー3"));
            sidePanel.add(new JButton("メニュー4"));
            sidePanel.add(new JButton("メニュー5"));

            // コンテンツパネル(CENTER - GridBagLayout)
            JPanel contentPanel = new JPanel(new GridBagLayout());
            GridBagConstraints gbc = new GridBagConstraints();
            gbc.insets = new Insets(5, 5, 5, 5);
            gbc.fill = GridBagConstraints.HORIZONTAL;

            gbc.gridx = 0; gbc.gridy = 0;
            contentPanel.add(new JLabel("ユーザー名:"), gbc);

            gbc.gridx = 1; gbc.gridwidth = 2;
            contentPanel.add(new JTextField(20), gbc);

            gbc.gridx = 0; gbc.gridy = 1; gbc.gridwidth = 1;
            contentPanel.add(new JLabel("パスワード:"), gbc);

            gbc.gridx = 1; gbc.gridwidth = 2;
            contentPanel.add(new JPasswordField(20), gbc);

            gbc.gridx = 1; gbc.gridy = 2;
            contentPanel.add(new JButton("ログイン"), gbc);

            gbc.gridx = 2;
            contentPanel.add(new JButton("キャンセル"), gbc);

            // メインパネルに追加
            mainPanel.add(headerPanel, BorderLayout.NORTH);
            mainPanel.add(sidePanel, BorderLayout.WEST);
            mainPanel.add(contentPanel, BorderLayout.CENTER);

            frame.add(mainPanel);
            frame.setVisible(true);
        });
    }
}setBorderやEmptyBorderで適切な余白を確保// デバッグ用にコンポーネントに色を設定
panel.setBackground(Color.PINK);
button.setBackground(Color.CYAN);次の章では、これらのレイアウトに配置したコンポーネントに「イベント処理の基本(ActionListenerなど)」を追加して、インタラクティブなアプリケーションを作成する方法を学びます。